Blog Archives
A PyQt widget for OpenCV camera preview
This is a hands-on post where I’ll show how to create a PyQt widget for previewing frames captured from a camera using OpenCV. In the process, it’ll be clear how to use OpenCV images with PyQt. I’ll not explain what PyQt and OpenCV are because if you don’t know them yet, you probably don’t need it and this post is not for you =P.
The main reason for integrating PyQt and OpenCV is to provide a more sophisticated UI for applications using OpenCV as basis for computer vision tasks. In my specific case, I needed it in the facial recognition prototype used in the interview for Globo TV I posted last week. I usually don’t write about such specific things, but there’s little information about it on the net. So I’d like to make a contribution sharing my findings.
The first problem to be solved is to show a cv.iplimage (the type of an OpenCV image in Python) object in a generic PyQt widget. This is easily solved by inheriting from QtGui.QImage this way:
import cv

from PyQt4 import QtGui

class OpenCVQImage(QtGui.QImage):

    def __init__(self, opencvBgrImg):
        depth, nChannels = opencvBgrImg.depth, opencvBgrImg.nChannels
        if depth != cv.IPL_DEPTH_8U or nChannels != 3:
            raise ValueError("the input image must be 8-bit, 3-channel")
        w, h = cv.GetSize(opencvBgrImg)
        opencvRgbImg = cv.CreateImage((w, h), depth, nChannels)
        # it's assumed the image is in BGR format
        cv.CvtColor(opencvBgrImg, opencvRgbImg, cv.CV_BGR2RGB)
        self._imgData = opencvRgbImg.tostring()
        super(OpenCVQImage, self).__init__(self._imgData, w, h, \
            QtGui.QImage.Format_RGB888)
The important lines here are 14-17:
- Line 14 converts the image from BGR to RGB format. OpenCV images loaded from files or queried from the camera often (not always; adapt it to your scenario) are delivered in BGR format, which is not what PyQt expects. Thus, I convert the image to RGB before going on. What happens if you skip this step? Well… nothing critical… the image will be shown with the channels R and B flipped.
- Line 15 saves a reference to the
opencvRgbImgbyte-content to prevent the garbage collector from deleting it when__init__returns. This is very important. - Lines 16-17 call the
QtGui.QImagebase class constructor passing the byte-content, dimensions and format of the image.
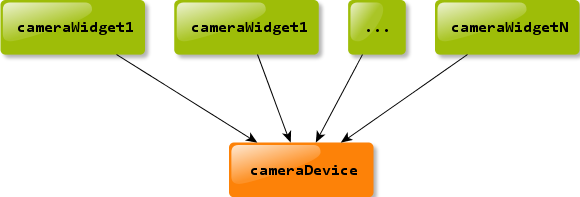
Done! If all you want is to show an OpenCV image in a PyQt widget, that’s all you need. However, for a camera preview it’s better to have a more convenient and complete API. Specifically, it must be straightforward to connect a camera device to a widget and still keep them decoupled. There should be one camera device, which can be seen as a frame provider, to many widgets:
And the frames must be manipulated independently by the widgets, i.e., the widgets must have complete control over the frames delivered to them.
The camera device can be encapsulated like this:
import cv

from PyQt4 import QtCore

class CameraDevice(QtCore.QObject):

    _DEFAULT_FPS = 30

    newFrame = QtCore.pyqtSignal(cv.iplimage)

    def __init__(self, cameraId=0, mirrored=False, parent=None):
        super(CameraDevice, self).__init__(parent)

        self.mirrored = mirrored

        self._cameraDevice = cv.CaptureFromCAM(cameraId)

        self._timer = QtCore.QTimer(self)
        self._timer.timeout.connect(self._queryFrame)
        self._timer.setInterval(1000/self.fps)

        self.paused = False

    @QtCore.pyqtSlot()
    def _queryFrame(self):
        frame = cv.QueryFrame(self._cameraDevice)
        if self.mirrored:
            mirroredFrame = cv.CreateImage(cv.GetSize(frame), frame.depth, \
                frame.nChannels)
            cv.Flip(frame, mirroredFrame, 1)
            frame = mirroredFrame
        self.newFrame.emit(frame)

    @property
    def paused(self):
        return not self._timer.isActive()

    @paused.setter
    def paused(self, p):
        if p:
            self._timer.stop()
        else:
            self._timer.start()

    @property
    def frameSize(self):
        w = cv.GetCaptureProperty(self._cameraDevice, \
            cv.CV_CAP_PROP_FRAME_WIDTH)
        h = cv.GetCaptureProperty(self._cameraDevice, \
            cv.CV_CAP_PROP_FRAME_HEIGHT)
        return int(w), int(h)

    @property
    def fps(self):
        fps = int(cv.GetCaptureProperty(self._cameraDevice, cv.CV_CAP_PROP_FPS))
        if not fps > 0:
            fps = self._DEFAULT_FPS
        return fps
I’ll not go through all this code because it’s not complex. Essentially, it uses a timer (with interval defined by the fps; lines 18-20) to query the camera for a new frame and emits a signal passing the captured frame as parameter (lines 26 and 32). The timer is important to avoid spending CPU time with unnecessary pooling. The rest is just bureaucracy.
Now, let’s see the camera widget itself. The main purpose of it is to draw the frames delivered by the camera device. But, before drawing a frame, it must allow anyone interested to process it, changing it if necessary without interfering with any other camera widget. Here’s the code:
import cv

from PyQt4 import QtCore
from PyQt4 import QtGui

class CameraWidget(QtGui.QWidget):

    newFrame = QtCore.pyqtSignal(cv.iplimage)

    def __init__(self, cameraDevice, parent=None):
        super(CameraWidget, self).__init__(parent)

        self._frame = None

        self._cameraDevice = cameraDevice
        self._cameraDevice.newFrame.connect(self._onNewFrame)

        w, h = self._cameraDevice.frameSize
        self.setMinimumSize(w, h)
        self.setMaximumSize(w, h)

    @QtCore.pyqtSlot(cv.iplimage)
    def _onNewFrame(self, frame):
        self._frame = cv.CloneImage(frame)
        self.newFrame.emit(self._frame)
        self.update()

    def changeEvent(self, e):
        if e.type() == QtCore.QEvent.EnabledChange:
            if self.isEnabled():
                self._cameraDevice.newFrame.connect(self._onNewFrame)
            else:
                self._cameraDevice.newFrame.disconnect(self._onNewFrame)

    def paintEvent(self, e):
        if self._frame is None:
            return
        painter = QtGui.QPainter(self)
        painter.drawImage(QtCore.QPoint(0, 0), OpenCVQImage(self._frame))
Again… I’ll not go through all this. The really important stuff is in the lines 24-26, 35 and 39. As stated before, it’s paramount that the widgets sharing a camera device don’t interfere with each other. In this case, all widgets receives the same frame, which in fact is a reference to the same memory location. This means that if a widget modifies a frame, the others will see it. Clearly, this is not desirable. So, every widget saves its own version of the frame (line 24). This way, they can do whatever they want safely. However, to process the frame is not responsibility of the widget. Thus, it emits a signal with the saved frame as parameter (line 25) and anyone connected to it can do the hard work.
It remains to draw the frame, what is done overriding the paintEvent method (line 35) of the QtGui.QWidget class. The relevant lines are 26 and 39. Line 26 forces a schedule of a paint event and line 39 effectively draws it when a paint event occurs (using OpenCVQImage as you can see).
The following snippet shows how to use all this together:
def _main():

    @QtCore.pyqtSlot(cv.iplimage)
    def onNewFrame(frame):
        cv.CvtColor(frame, frame, cv.CV_RGB2BGR)
        msg = "processed frame"
        font = cv.InitFont(cv.CV_FONT_HERSHEY_DUPLEX, 1.0, 1.0)
        tsize, baseline = cv.GetTextSize(msg, font)
        w, h = cv.GetSize(frame)
        tpt = (w - tsize[0]) / 2, (h - tsize[1]) / 2
        cv.PutText(frame, msg, tpt, font, cv.RGB(255, 0, 0))

    import sys

    app = QtGui.QApplication(sys.argv)

    cameraDevice = CameraDevice(mirrored=True)

    cameraWidget1 = CameraWidget(cameraDevice)
    cameraWidget1.newFrame.connect(onNewFrame)
    cameraWidget1.show()

    cameraWidget2 = CameraWidget(cameraDevice)
    cameraWidget2.show()

    sys.exit(app.exec_())
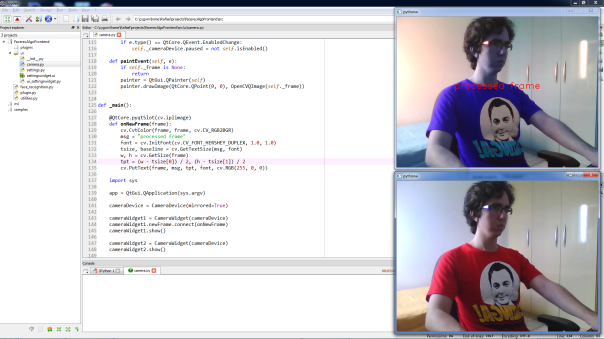
See that two CameraWidget objects share the same CameraDevice (lines 17, 19 and 23), but only the first processes the frames (lines 4 and 20). The result is two widgets showing different images resulting from the same frame, as expected:
Now you can embed CameraWidget in a PyQt application and have a fresh OpenCV camera preview. Cool huh? I hope you enjoyed it =P.
Until next…

